Hay left unprotected loses up to 35% of its nutritional value in a single season. Rain, ground moisture, and UV exposure break down protein and digestible fibre, turning a premium product into expensive mulch. A properly designed hay shed pays for itself within 2 to 3 seasons through reduced spoilage alone.
But not all hay sheds are equal. Get the orientation wrong, the wall height too low, or the ventilation inadequate, and you’ll still lose hay. This guide covers the design principles that make a hay shed actually work.
Open Front vs Enclosed Hay Shed
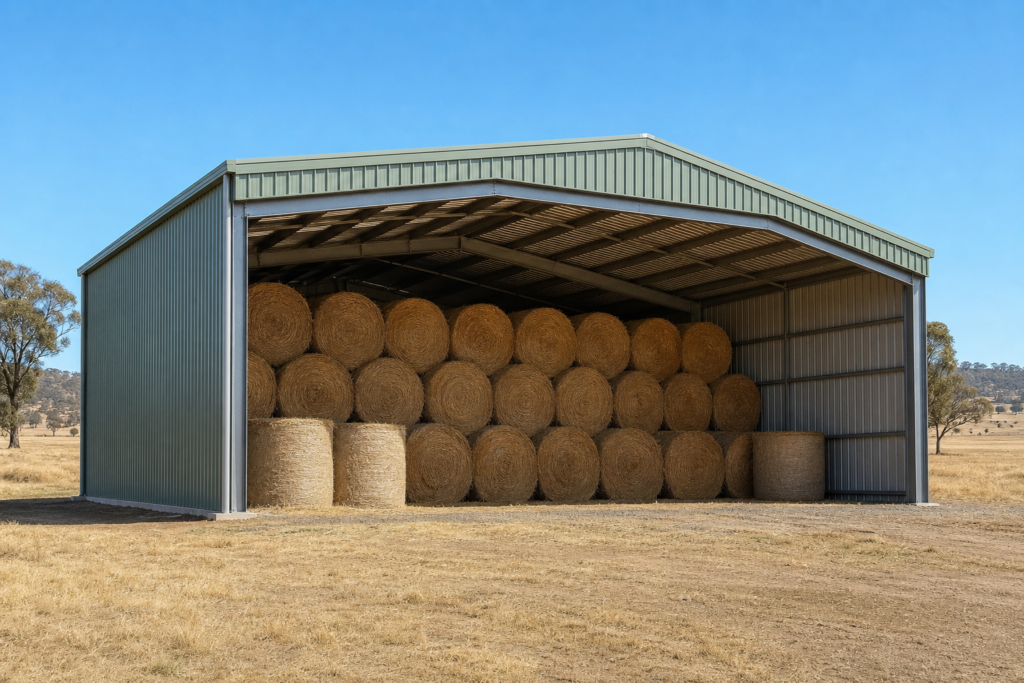
Open Front (Recommended)
The industry standard for hay storage, and for good reason:
- Airflow: natural ventilation from the open face keeps moisture levels down and prevents mould
- Loading: forklifts, telehandlers, and front-end loaders can access the stack directly
- Cost: less cladding, no doors, cheaper to build
- Fire risk: better ventilation reduces spontaneous combustion risk from damp bales
Enclosed
Used when security is a concern (theft), you’re near the coast (salt air), or the hay is premium export grade that needs maximum weather protection:
- Fully clad with roller doors on the loading face
- Requires mechanical ventilation or large louvre vents to prevent moisture build-up
- Higher cost due to cladding, doors, and ventilation
For most Australian farms, an open-front shed is the right answer.
Orientation: Where to Face the Opening
The open side of a hay shed should face away from prevailing weather. In most of Australia:
- Best: North or north-east facing opening, avoids prevailing westerly and south-westerly storms
- Acceptable: East facing, catches morning sun (helps dry surface moisture) without afternoon weather exposure
- Avoid: West or south-west facing, directly into prevailing storm fronts in most regions
Check your local prevailing wind direction, it varies by region. In tropical QLD, cyclone-season storms come from the north-east, so orientation decisions are reversed.
Sizing Your Hay Shed
Wall Height
Wall height determines how high you can stack and therefore how much hay fits in a given floor area. Stacking capacity:
- 4.5m walls: 2 round bales high (standard 5ft bales) or 6 to 8 small squares high
- 6m walls: 3 round bales high or 10 to 12 small squares high
- 7.5m walls: 4 round bales high, maximum practical stacking height
Go taller than you think you need. The incremental cost of an extra metre of wall height is small compared to the cost of building a second shed when you run out of room.
Floor Area
Calculate based on your annual production or purchase volume. A 5ft round bale occupies roughly 1.2m x 1.5m on the ground. A standard small square bale is about 0.35m x 0.45m. Stack them and divide:
Example: 500 round bales at 3 high = 167 ground positions × ~1.8m² each = ~300m² minimum floor area. Add 20% for loading access = 360m². A 12m × 30m shed (360m²) would fit.
Bay Spacing
Standard bay spacings for hay sheds are 4.5m or 6m. Wider bays = fewer columns in the way of telehandlers. 6m bays are preferred for hay storage as they give better loading access.
Ventilation and Moisture Management
Hay below 15% moisture is safe to stack. Above that, you’re risking mould and potential spontaneous combustion (yes, hay fires are real). Good shed design helps manage moisture:
- Open front: passive ventilation from the open face
- Ridge vents: let hot, humid air escape from the highest point
- Air gap at base: never stack hay directly on a concrete slab. Use pallets, railway sleepers, or a gravel base to allow air circulation under the bottom row
- Don’t stack to the walls: leave a 150 to 300mm gap between the stack and the back/side walls for air to circulate
- Monitor: use a hay probe thermometer on freshly stored hay. If core temperatures exceed 55°C, you have a fire risk
Flooring Options
- Compacted gravel/road base: cheapest option. Adequate for most farm hay sheds. Good drainage, allows some ground-level airflow through the base
- Concrete slab: clean, permanent, easy to sweep and maintain. Required if you’re storing export hay or need to meet food-safety standards. Higher cost but lasts forever
- Earth: not recommended. Ground moisture wicks into bottom bales regardless of pallets
Read our foundations guide for more on slab design.
Fire Safety
Hay shed fires destroy millions of dollars of fodder every year in Australia. Design mitigations:
- Separation distance: build the hay shed at least 20m from other buildings, fences, and power lines
- No electrical wiring inside: unless it’s in conduit and the shed is enclosed. Rodents chew wiring
- Lightning protection: tall steel buildings are natural lightning targets. Earth the frame properly
- Access for fire trucks: maintain clear access around all sides
- Fire break: mow or grade a bare-earth break around the shed before fire season
How Much Does a Hay Shed Cost?
We don’t publish price ranges, because every hay shed is engineered for its own site and built to its own design. The price comes down to the size of your stack, the number of bays, wall height for loaders and your wind region.
For accurate pricing, design your hay shed online.